Crafting & placing Tracks
Crafting Tracks
Tracks are built in several steps and require varying numbers and types of items, depending on the track you're trying to build. Here's the process of creating your railways, split into a number of steps:
1. Getting the Blueprint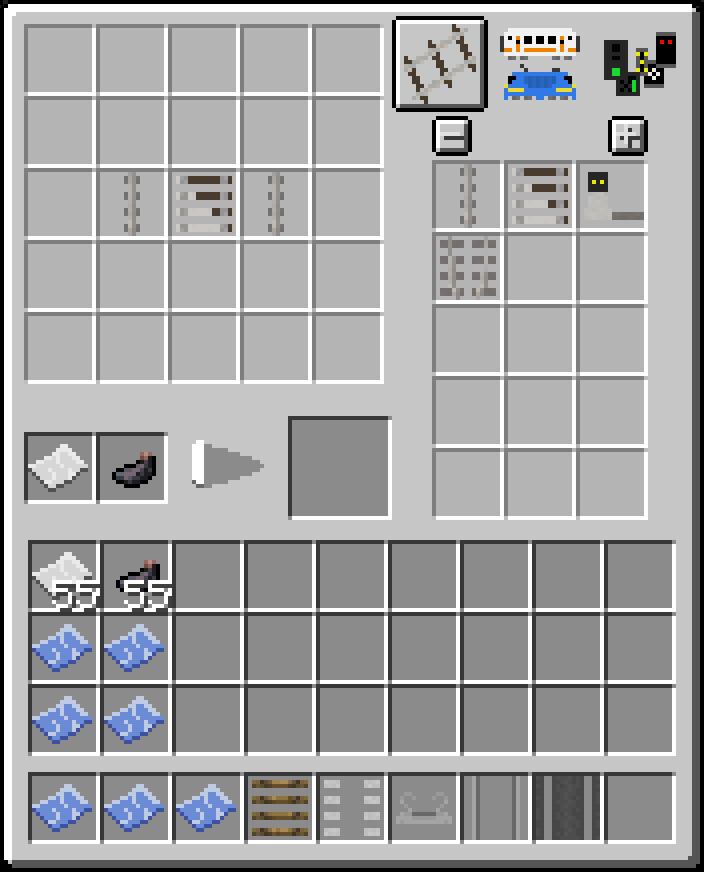
Open the Engineer's Table GUI and switch to the first tab, if you aren't already there. The tracks tab is the left-most tab, the one with the rail.
Use the items on the right to place the track recipe into the 5x5 grid on the left. Then, put paper and ink into the two slots below the 5x5 grid. If your shape is valid, it'll print the track's blueprint. The printing process is indicated by the triangular shape going white. Once finished, you can take the blueprint out from the large slot in the center.
All track blueprints can also be found in the Zora no Densha General Creative Tab.
2. Placing the guides
With your blueprint in hand, point at the block you'd like to place the track on. If the track can be placed (i.e. if there are no obstructions, and the ground is even), a transparent, blue ghost-track will appear. Right-click to confirm and to place the guides. If successful, the track's hitboxes will appear, along with red-white stilts marking the track's path.
While the track shows guides, it is safe to dig and remove the ground below. Removing ground from below (partially) finished tracks will destroy them.
If you misplace a blueprint, you can break it by hand if it's empty. If you want to take away a component, you'll have to break it with a crowbar.
3. Finishing the track
Gather and apply all items of the track. As rule of thumb, each track needs as many Track Beds, Clamps, and Rails as it is meters long. I.e. a straight track of 8 meters length will need 8 Track Beds, Clamps, and Rails. Special tracks might require additional items. Some tracks can also receive an upgrade with Crossing Plates.
Apply track parts in following order:
- Track beds first
- clamps follow
- rails finish.
Crossing plates and any additional items come last.
Note that an exception is the maintenance track; it requires Stilts instead of Track Beds.
Demolishing
To remove a track while retaining its items, hit the track with a Crowbar. Any other item will break the track.
Extra: Copying tracks while in creative mode
Using the Trackman's Tool, it is possible to copy finished tracks.
Right-click the track you'd like to copy. A chat message should appear to confirm that the track was successfully copied. You can now create infinite copies of the track.
Note: As tracks are a Tile Entity, it is generally unsafe to copy them using WorldEdit or similar tools. We do not take responsibility in case of crashes or any other unexpected behaviour that resulted from track copying.
Types of Tracks
Straights:
Straight Track (0°)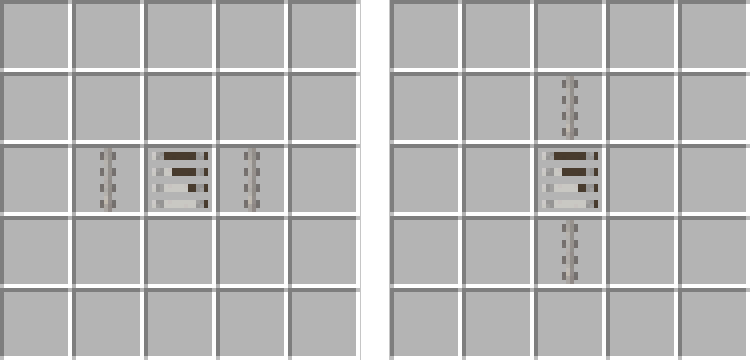
- Area: 1x1
- Track Beds: 1
- Fastenings: 1
- Rails: 1
- Plates: 1
Straight Track (0°,2m)
- Area: 1x2
- Track Beds: 2
- Fastenings: 2
- Rails: 2
- Plates: 2
Straight Track (0°, 4m)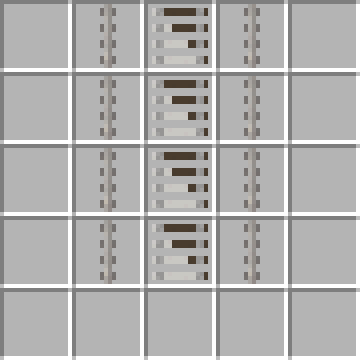
- Area: 1x4
- Track Beds: 4
- Fastenings: 4
- Rails: 4
- Plates: 4
Straight Track (0°, 8m)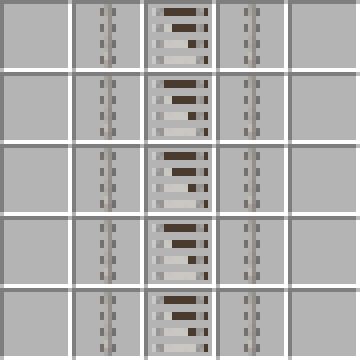
- Area: 1x8
- Track Beds: 8
- Fastenings: 8
- Rails: 8
- Plates: 8
Straight Maintenance Track (0°)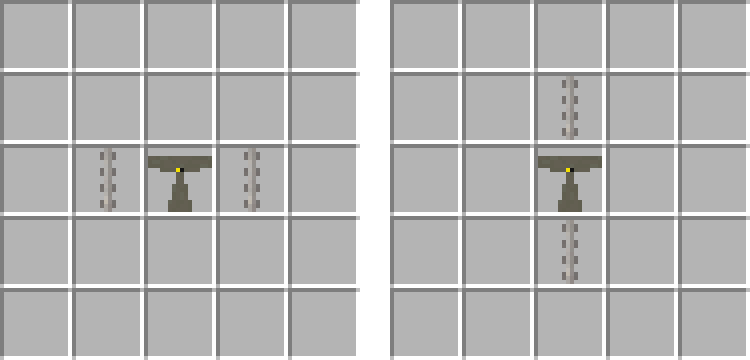
- Area: 1x1
- Stilts: 1
- Fastenings: 1
- Rails: 1
Straight Track (11°)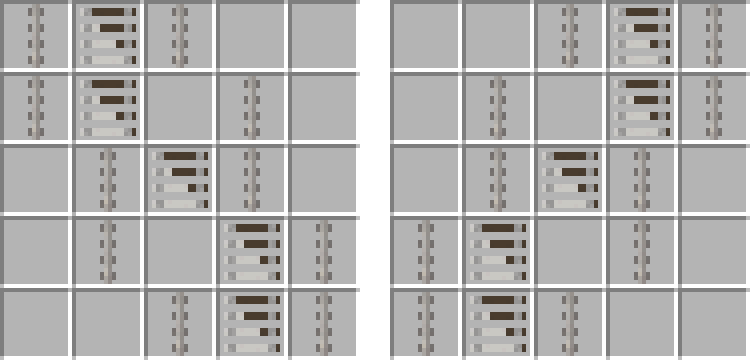
- Area: 2x5
- Track Beds: 5
- Fastenings: 5
- Rails: 5
- Plates: 5
Straight Track (18°)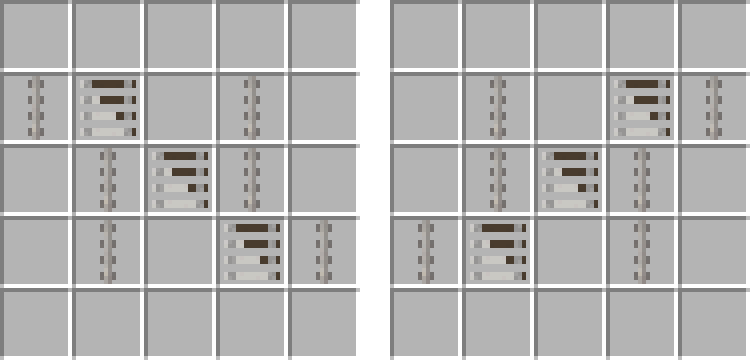
- Area: 2x3
- Track Beds: 3
- Fastenings: 3
- Rails: 3
- Plates: 3
Straight Track (45°)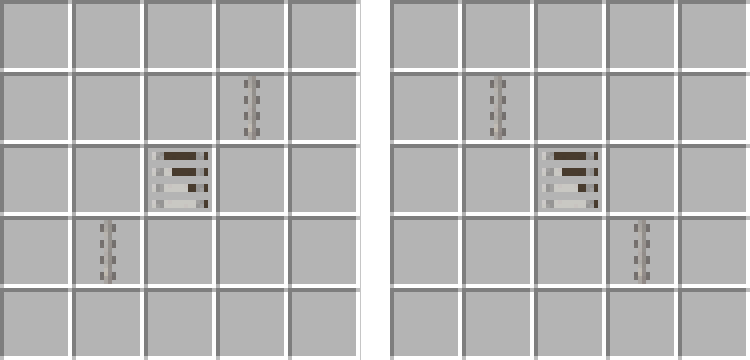
- Area: 1x1 (Overhanging)
- Track Beds: 1
- Fastenings: 1
- Rails: 1
- Plates: 1
Straight Track (45°,2m)
- Area: 1x2 (Overhanging)
- Track Beds: 2
- Fastenings: 2
- Rails: 2
- Plates: 2
Straight Track (45°,4m)
- Area: 1x4 (Overhanging)
- Track Beds: 4
- Fastenings: 4
- Rails: 4
- Plates: 4
Straight Track (45°,8m)
- Area: 1x8 (Overhanging)
- Track Beds: 8
- Fastenings: 8
- Rails: 8
- Plates: 8
Slope Track (10m)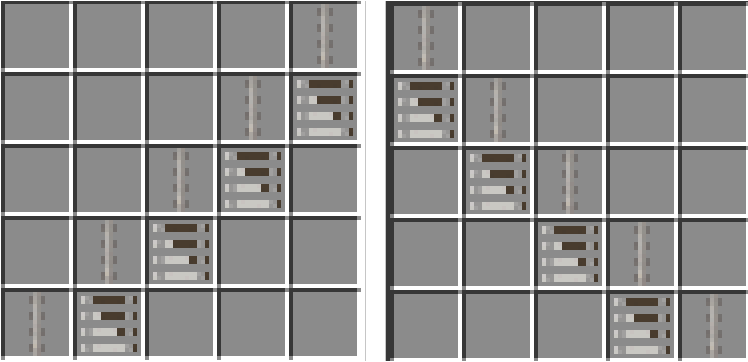
- Area: 1x10
- Track Beds: 10
- Fastenings: 10
- Rails: 10
Slope Track (16m)
- Area: 1x16
- Track Beds: 16
- Fastenings: 16
- Rails: 16
Curves:
Curve Track (0° to 11°)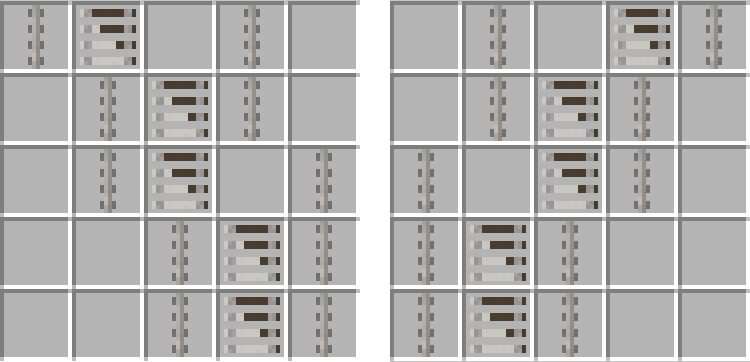
- Area: 2x10
- Track Beds: 10
- Fastenings: 10
- Rails: 10
Curve Track (11° to 18°)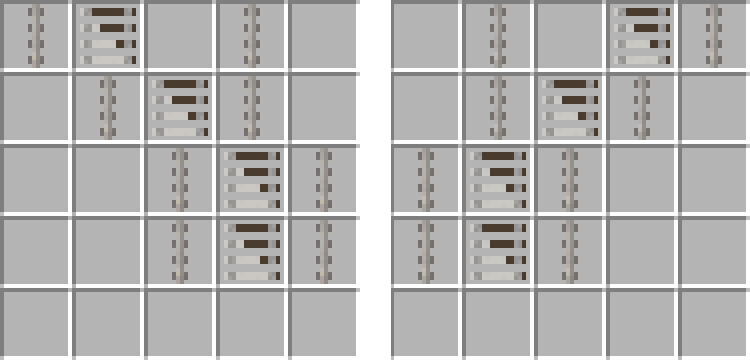
- Area: 2x4
- Track Beds: 4
- Fastenings: 4
- Rails: 4
Curve Track (18° to 45°,6m)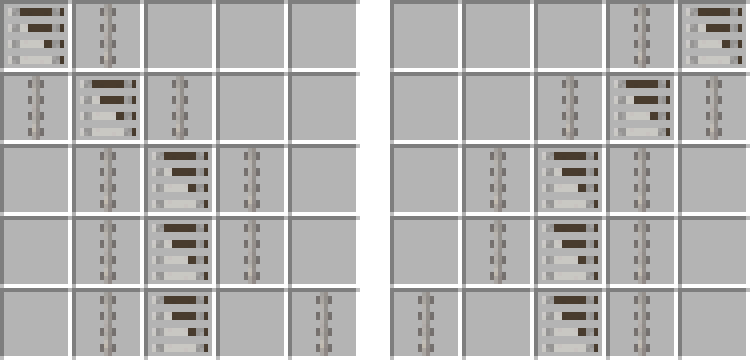
- Area: 4x6
- Track Beds: 6
- Fastenings: 6
- Rails: 6
Curve Track (18° to 45°,10m)
- Area: 4x10
- Track Beds: 10
- Fastenings: 10
- Rails: 10
S-Curve Track (0°, 8m)
- Area: 2x8
- Track Beds: 8
- Fastenings: 8
- Rails: 8
Switches:
Switch Track (0° to 0°/11°)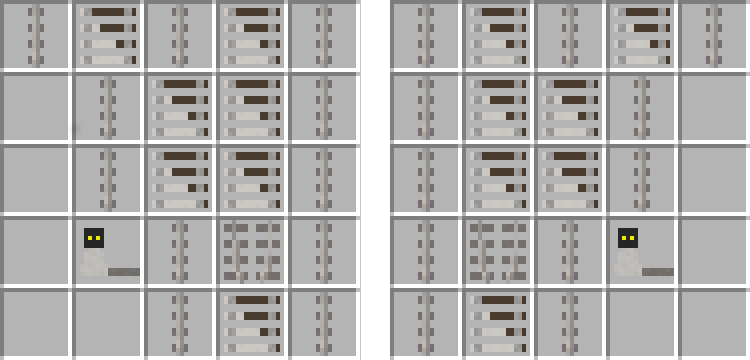
- Area: 2x10
- Track Beds: 7
- Fastenings: 11
- Rails: 11
Switch Track (11° to 11°/0°)
- Area: 2x10
- Track Beds: 7
- Fastenings: 11
- Rails: 11
Switch Track (0° to 11°/0° - 3-way)
- Area: 3x10
- Track Beds: 7
- Fastenings: 11
- Rails: 11
Crossings:
Cross Track (0°)
- Area: 1x1
- Track Beds: 1
- Fastenings: 1
- Rails: 1
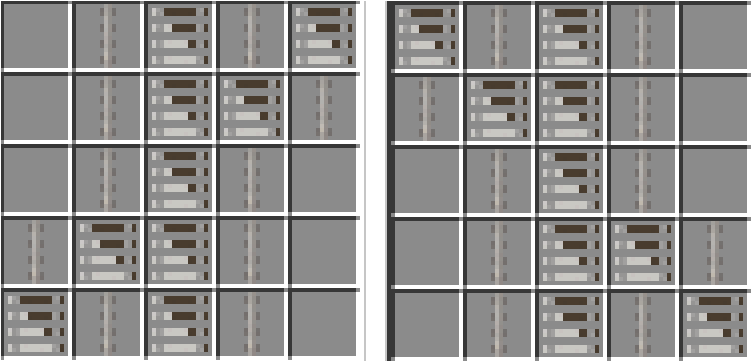 Cross Track (0°/11°)
- Area: 1x10
- Track Beds: 11
- Fastenings: 11
- Rails: 11
Cross Track (11°/11°,10m)
- Area: 1x10
- Track Beds: 11
- Fastenings: 11
- Rails: 11
Cross Track (11°/11°,5m)
- Area: 1x5
- Track Beds: 6
- Fastenings: 6
- Rails: 6
Cross Track (45°)
- Area: 1x1
- Track Beds: 1
- Fastenings: 1
- Rails: 1
Others:
Buffer Track (0°)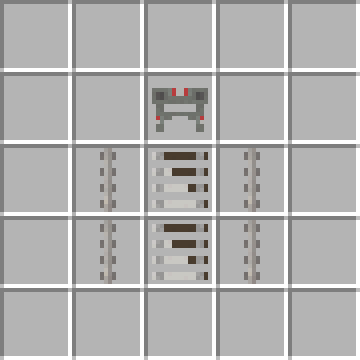
- Area: 1x2
- Track Beds: 2
- Fastenings: 2
- Rails: 2
- Plates: 1
- Buffer: 1
Buffer Track (11°)
- Area: 1x2
- Track Beds: 2
- Fastenings: 2
- Rails: 2
- Plates: 1
- Buffer: 1
Buffer Track (18°)
- Area: 1x2
- Track Beds: 2
- Fastenings: 2
- Rails: 2
- Plates: 1
- Buffer: 1
Buffer Track (45°)
- Area: 1x2
- Track Beds: 2
- Fastenings: 2
- Rails: 2
- Plates: 1
- Buffer: 1
Transition Track (0°)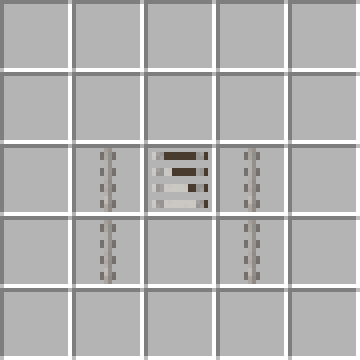
- Area: 1x2
- Track Beds: 2
- Fastenings: 2
- Rails: 2
Further Information
Maintenance Track (0°)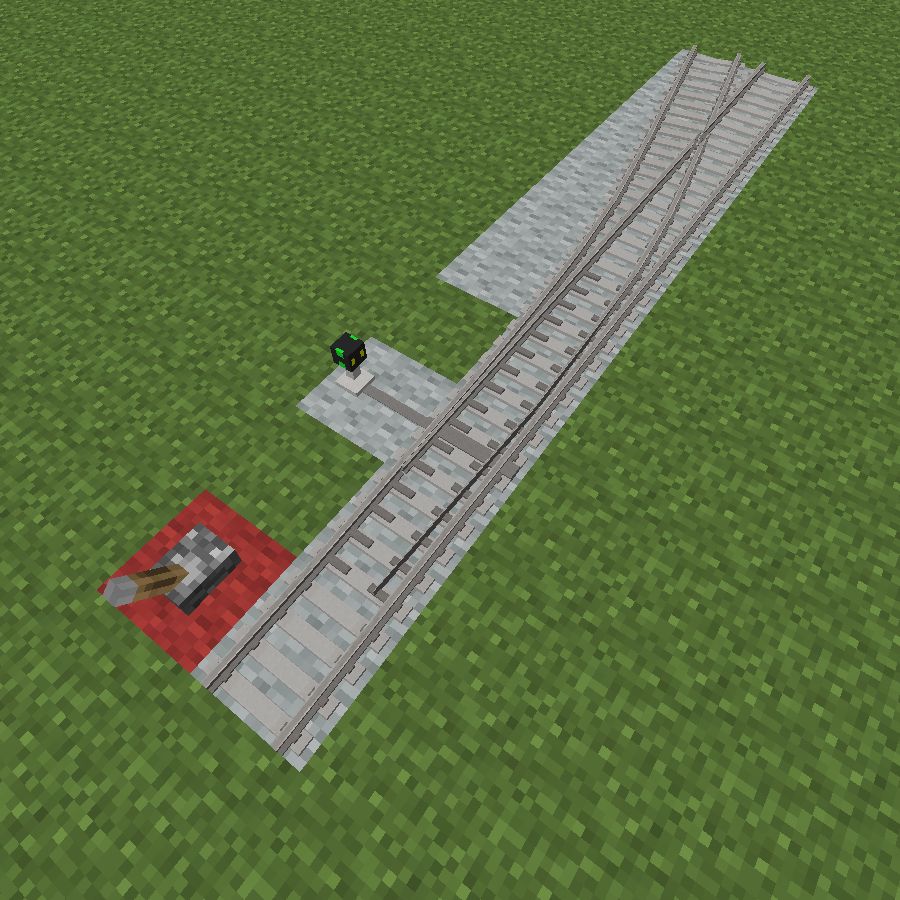
The Maintenance Track requires Stilts instead of Track Beds for construction. This track is 1 metre (= 1 block) above ground level and can be used to view a vehicle from below. Maintenance Tracks are also an essential part of the process of train creation. Right-clicking
the Maintenance Track with a crowbar hides its stilt.
Switch Tracks
To move a switch by Redstone state, remove the switching lever with the crowbar (rightclick) and apply the pulse to the origin (=source of the track) of the switch (see image on the right). Applying a Redstone pulse to the switch changes the path it is set to.
To move the 3-way switch by Redstone state, place a Redstone source on the left to set the switch to go left or place a Redstone source on the right to set the switch to go right. Only one side can be powered at a time - if both are powered the switch will revert to going straight.